
Using Flutter Example Project: Flutter Remote Temperature Sensor
| Skill Level: | Beginner | Tools required: | 2x Flutter boards (Basic or Pro) 1x TMP36 Temperature Sensor Soldering Supplies |
If you're familiar with Arduino or have gone through our ARDUINO PRIMER, you may be curious to know how Flutter can make your projects even better.
Using the example from our ARDUINO PRIMER we will show how Flutter lets you get the temperature information somewhere more useful, like in the Kitchen.
Flutter & your wine cellar
This tutorial shows you how Flutter can be used to send simple sensor data, in this case temperature, from one place to another; a great introduction to the basic concepts of Flutter. Imagine we have a wine cellar that we want to keep below 70 degrees. We'll use Flutter to install a temperature sensor in the wine cellar, with a temperature readout that can be placed anywhere in the house.
Starting first with the wine cellar we will need just a Flutter board, power, and the temperature sensor. As we saw in the last tutorial, the sensor is just three wires and in this case specifically, wiring up power, ground, and the temperature output signal is simple to do with a Flutter Breakout. We could solder the temperature sensor directly to the Flutter board, but the Breakout makes it easier to re-use the Flutter board later, and the Breakout's mounting holes give us a simple way of mounting the project to the wall, or wherever we want to place it. We follow the power and ground wiring noted in the Arduino Primer, and send the temperature output signal to Analog input A3 as shown below, with a small amount of heat shrink tubing used over one leg of the temperature sensor to prevent any short circuits.
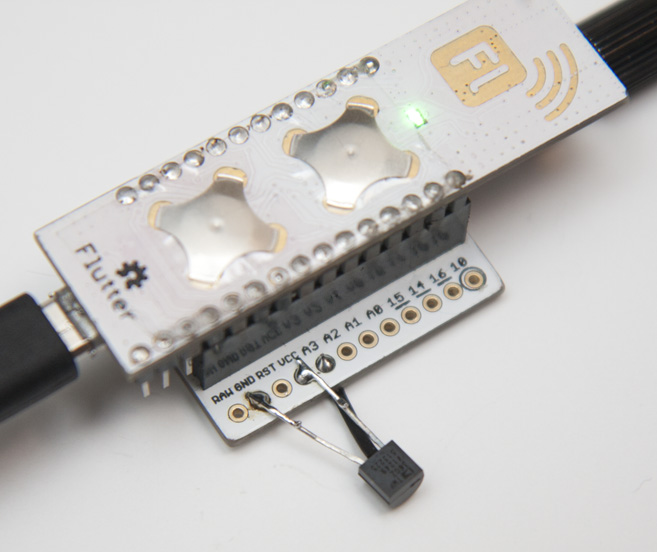 [*Pre-Production Photo Flutter Pro plugged into the Flutter Breakout, with a TMP36 temperature sensor soldered to the Flutter Breakout.]
Soldering is incredibly simple, and as time goes on we will write detailed tutorials on soldering and other skills you need to get the best out of Flutter. You don't have to solder the temperature sensor on though if you're just working on learning the concepts or just don't want something permanent. A breadboard (like the one provided in the Starter Kit add-on on our Kickstarter page) is another great way to start using Flutter, as stiff wires just press in to the rows in the board by hand, no soldering required. Like soldering, we'll cover breadboarding in it's own tutorial, but you can see from the image below that using a breadboard to measure temperature is also very simple.
 [*Pre-Production Photo A complete Flutter powered wireless temperature monitoring system, not including USB cable.]
However we connect the sensor to our Flutter board, the code will be the same. In the last example, we talked about readling analog sensor data like temperature in an Arduino. This is the same with Flutter. We still use the Arduino programming environment, and use the same code to read the temperature, but this time, instead of lighting up an LED when the temperature gets too high, lets just send the temperature up to another Flutter board and let that board decide what to do with the information.
Before we involve anything wireless, lets just plug the Flutter board to our computer over USB and have it send the temperature to the screen. This is a simple way to make sure everything is working as intended with the sensor before we move on, and we can accomplish this with Arduino's built in Serial library. Lets show you the code we came up with, and then examine some of the changes we made.
/* Flutter Example 1 | Temperature Sensor */
int   led = 13;
int   sensorPin = A3;
int   reading = 0;
int   temperature_cutoff = 60;

float   voltage = 0;
float   temperatureC = 0;
float   temperatureF = 0;

// the setup routine runs once when you press reset:
void setup()
{
  // initialize the digital pin as an output.
    pinMode(led, OUTPUT);
    pinMode(sensorPin, INPUT);
    Serial.begin(9600);
}

// the loop routine runs over and over again forever:
void loop() {

reading = analogRead(sensorPin); //get reading
voltage = (reading * 3.3) / 1024.0; //convert to voltage
temperatureC = (voltage - 0.5) * 100 ; //convert to temp in degrees C
temperatureF = temperatureC * 9/5 + 32; //convert that to degrees F

//print out temperature data, looks like the following line:
//Temp is: 81.22 deg F, 27.34 deg C

Serial.print("Temp is: ");
Serial.print(temperatureF);
Serial.print(" deg F, ");
Serial.print(temperatureC);
Serial.println(" deg C"); //we use println this time to finish the line

delay(1000); //wait 1 second before checking again

}
We add one line of code in the setup function to initialize the Serial port and then instead of checking the temperature once a second we send the converted values out the serial port for the computer to display. On the computer side, we can open the Arduino Serial Monitor inside the arduino programming window (Tools > Serial Monitor), and we should start seeing text show up onscreen about once per second.
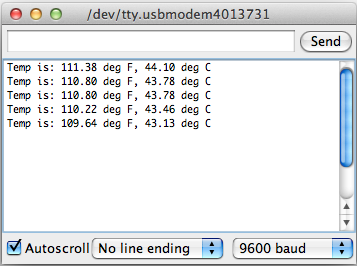
We heated our board up with a hairdryer so we could check it at room temperature and at some higher temperatures, and then verified the numbers with our thermal imager.
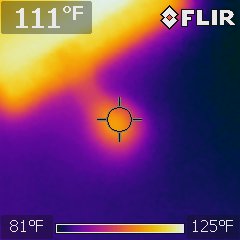
There's many ways of verifying the temperature measurement but it's an important step; when we first ran our own code we got numbers of around 150 degrees F when the room was only around 80 degrees. We discovered that the math from line 24 in the example code above, where we calculate the voltage, assumed a 5 volt system. Since Flutter is 3.3 volts we fixed the value, reloaded our code, and then everything was spot on. Never underestimate the value of checking your progress along the way.
So now that we've got solid temperature measurements let's send them somewhere wirelessly! We modify our code to send the temperature wirelessly via Flutter instead of sending it to the computer over USB.
#include "Flutterlib.h"

/* Flutter Example 1 | Temperature Sensor Transmitter */

int   sensorPin = A3;
int   reading = 0;
int   temperature_cutoff = 60;

float   voltage = 0;
float   temperatureC = 0;
float   temperatureF = 0;

int network = 0;
int address = 1;
int channel = 0;

Radio radio; //declare a flutter radio

// the setup routine runs once when you press reset:
void setup()
{
  // initialize the digital pin as an output.
    pinMode(sensorPin, INPUT);
    Serial.begin(9600);

    //initialize our radio with basic comms settings and the specified parameters
    radio.begin(network, address, channel);
}


// the loop routine runs over and over again forever:
void loop() {

reading = analogRead(sensorPin); //get reading
voltage = (reading * 3.3) / 1024.0; //convert to voltage
temperatureC = (voltage - 0.5) * 100 ; //convert to temp in degrees C
temperatureF = temperatureC * 9/5 + 32; //convert that to degrees F

//sends a floating point variable to the broadcast address (0xFF)
radio.sendFloat(temperatureF, 0xFF);

delay(1000); //wait 1 second before checking again

}
There's a variety of ways to send the data but we'll just send the temperature in degrees Fahrenheit to the broadcast address, which means any Flutter boards listening for data from this network will get the message.
The line:
radio.sendFloat(temperatureF, 0xFF);...is all that is needed to send the temperature value wirelessly to another device, after the two other lines of setup code. With this code running, we transmit the wine cellar temperature once per second to anyone that is listening.
Lets see what the code for the listener looks like:
#include "Flutterlib.h"

/* Flutter Example 1 | Temperature Sensor Reciever */

float   temperatureF = 0;

int network = 0;
int address = 1;
int channel = 0;

Radio radio; //declare a flutter radio

// the setup routine runs once when you press reset:
void setup()
{
  // initialize the digital pin as an output.
    Serial.begin(9600);

    //initialize our radio with basic comms settings and the specified parameters
    radio.begin(network, address, channel);
}


// the loop routine runs over and over again forever:
void loop() {

  //see if we got a packet & it contains our temperature.
  if(radio.process() && radio.lastCommand==DATA_FLOAT)
  {
    temperatureF = radio.lastFloat; //recieve the temperature

    //print out temperature data, looks like the following line:
    //Temp is: 81.22 deg F, 27.34 deg C
    Serial.print("Temp is: ");
    Serial.print(temperatureF);
    Serial.print(" deg F, ");
    Serial.print(temperatureC);
    Serial.println(" deg C"); //we use println this time to finish the line
  }


}
The above code receives the sensor data wirelessly and sends it to the Arduino Serial Monitor. This should look just like the first time we sent temperature data to the Serial Monitor, only in this instance the temperature sensor can be placed anywhere up to a kilometer away! The simple code above is all you need to start building sensor networks at your home.
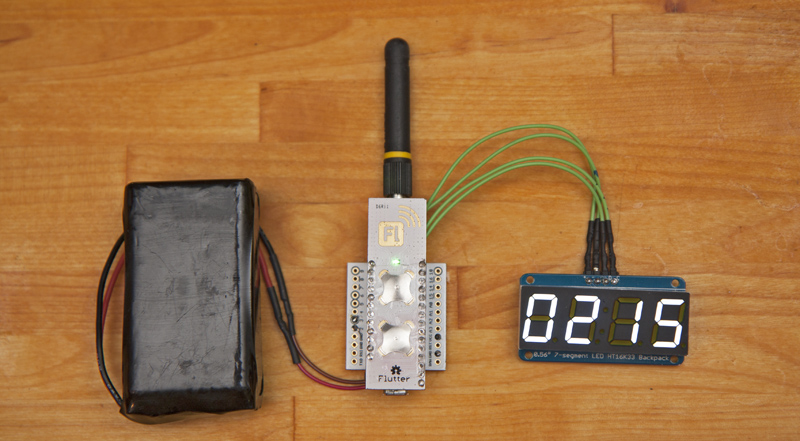
Of course, this just displays the data to an attached PC. There's all kinds of ways of using Flutter to indicate the state of your wine cellar. You can build a warning sign with a red light that is activated above our temperature trip point, use a buzzer to sound a warning, display the actual temperature on a simple LED display like the one below, or even send the data to your phone or the web.
As we continue to expand our tutorials section we'll talk about the other ways we can display this information.