
What's an Arduino?
| Skill Level: | Beginner | Tools required: | An eager mind |
Arduino is an electronics prototyping platform, which is a fancy way of saying "Arduino makes it easy for regular people to build electronics". Specifically, Arduino makes it easy for people to build electronics that run simple computer programs (they don't *have* to be simple though, people build flying robots with this stuff).
Lets say you have some project, where you want to flip a switch and have an LED turn on. Simple! The entire electrical circuit has 4 parts and would look like this, no Arduino needed:

The entire electrical circuit is just a battery pack wired to a switch, then a resistor, then the LED, then the wires go back to the battery. Super simple. (See this SPARKFUN TUTORIAL for more info on why the resistor is needed.)
Flip that switch and the LED turns on! That's basic electronics right there.
But what if you only want the LED to turn on when certain conditions are met? A switch with a light isn't that useful, but lets say you only want the LED to turn on if the temperature of your wine cellar gets above 60 degrees Fahrenheit, perhaps for a warning sign on the wine cellar's door.
You need a temperature sensor, but where would you add it to the circuit? And how does it know when to turn the light on? Wouldn't it be great if you could just tell the light "if the temperature is above 60 degrees, turn on"?
That can be tricky to do with just electronics, but it's easy to do with software, and that's where Arduino comes in. The Arduino is a small computer connected to your electrical circuit. It's a complete computer, with some storage space for your program, RAM for holding numbers being used while the program runs, and a processor core that takes the program code and does something with it. You write programs for the Arduino in a super simple code editor designed for regular people. Here's the basic Arduino "Blink" example, with only 6 lines of simple code, you can blink an LED in real life. That's a lot easier than doing it without the Arduino.
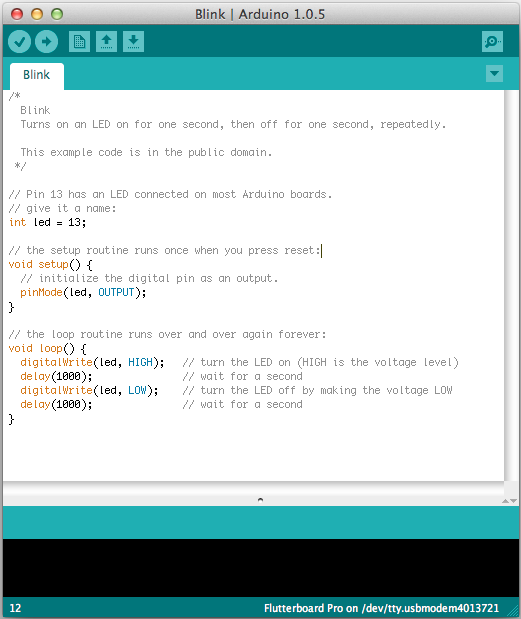 [Arduino code editor, showing an entire program for blinking an LED.]
With a computer in your circuit, turning the light on at a certain temperature is easy. Instead of wiring the LED to a switch and battery, we wire it to the Arduino, so we can turn it on with some simple code. In the example above, the program to blink an LED is shown. It will turn on the LED, wait one second, turn it off, wait one second, and then repeat. This shows how computer code can do things in the real world!
 [Diagram showing a resistor and LED wired to the popular Arduino UNO.]
Once you can turn on and off the LED, you just need to be able to get the temperature into your program and you'll be pretty much done. The simplest way to do that is with an inexpensive temperature sensor like the TMP36. It hooks up with three wires, and at $1.50 it's a little more expensive than some other types of temperature sensors, but it's accurate and easy to use. See this excellent ADAFRUIT TUTORIAL on the TMP36 sensor for a more detailed explanation of its operation.
Electrical things need power (+) and ground (-) to work, so that's what two of the sensor's wires are. The second wire is the output, and it's easy to measure with our Arduino; it's just a voltage that changes with temperature, and the Arduino is great for taking a voltage and turning it into a number in our program. We'll wire up the sensor and then see how to read the temperature in code.
 [Diagram showing an LED and temperature sensor wired to the Arduino UNO.]
These are just simple diagrams, but the actual wiring is easy too, and there's a huge community of others who use Arduino and write excellent TUTORIALS on exactly how to do things like this, so Arduino is as easy to learn as it is to use.
In the above circuit, we've got the sensor output hooked up to the A0 input. Looking again at the temperature sensor TUTORIAL from Adafruit, we see that only some simple code is needed to measure the voltage and convert it to temperature:
reading = analogRead(sensorPin); //get reading
voltage = (reading * 5.0) / 1024.0; //convert to voltage
temperatureC = (voltage - 0.5) * 100 ; //convert to temp in degrees C
temperatureF = temperatureC * 9/5 + 32; //convert that to degrees F
Then to actually make the LED turn on when the temperature gets too high, the code is very simple:
if(temperatureF > temperature_cutoff)
{
  digitalWrite(led, HIGH);   // turn the LED on if the temp is over 60
}
So if the temperature is greater than 60, the LED turns on!
The entire program to turn on and off the LED based on the temperature is as follows:
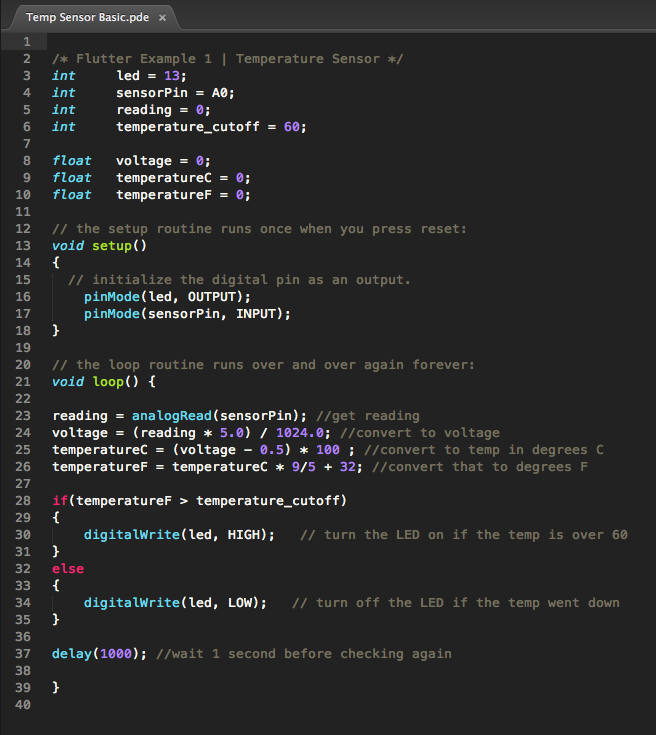 [Code showing an LED controlled by a temperature sensor. Note the temperature cutoff variable is set at the top of the code.]
With the above code and the basic wiring to Arduino, you've now built a device that uses simple computer code to show you real-world things. Once you've learned the basics, it's easy to pick up and take this even farther. In the next tutorial, we'll show you how a few more lines of code that let you put the LED anywhere in your house, using Flutter for the communications.